HEADS UP – THIS CONTENT IS OLD.
Section A:
When a Tripod is Unavailable
New to the site or just plain bored? Stalk the monkey on Facebook, Twitter, or Flickr.
There is no question about it. When shooting bracketed exposures for HDR Photography a good solid tripod is king. Since all of the exposures are going to be combined on top of each other to achieve the HDR effect, any subtle position shifts from exposure to exposure will hurt the final result. Thankfully, I’ve developed a handy workflow to combat those situations where you find yourself unable to shoot with a tripod.
So why not always use a tripod?
More often than not, you should be able to use a tripod in the field. Sometimes however, whether it’s due to uncooperative terrain or photography restrictions in a particular area, you will encounter a situation where you will have to shoot exposure brackets ‘hand held’.
Photography restrictions?
Ever since 9-11, photography restrictions have increased across the board. These restrictions include anything that could be considered suspect or suspicious. Mostly, It restricts photography of any transportation devices such as subway & railway stations, buses & trains; but it also extends to any government areas like police & fire stations. Photography in these areas is possible (if you’re sneaky) but setting up a tripod is a sure fire way to attract attention. Sometimes it’s just the tripod that is not allowed. You can literally snap as many hand held shots as you want but the second you set up a tripod, your out of there.
Photography restrictions also extend to public and private property and attractions. This is especially evident when visiting foreign cities. I’ve had this problem multiple times throughout Europe. I’ve had issues in The Pantheon and The Vatican in Rome because I was shooting with a tripod. I’ve also encountered this same problem in London and Sydney. With some research and well, some experience being told to stop shooting, I have discovered that in most cases, as long as you don’t set up a tripod, you can pretty much shoot all you want. The bottom line is that apparently, tripod = ‘professional’ , handheld = ‘amateur’; and most of these places are trying to cut down on reproduction and sales of images since they sell their own material.
There are also some places that you just can’t set up a tripod. Sometimes you only have a fleeting moment to capture the shot and sometimes you are in a precarious position like on the side of a mountain or on top of a shabby structure.
There are even some instances where you encounter camera shake even when using a tripod. Some examples are when you are using a weak or unstable tripod, or in windy shooting environments. Both of these scenarios can cause the camera to shake.
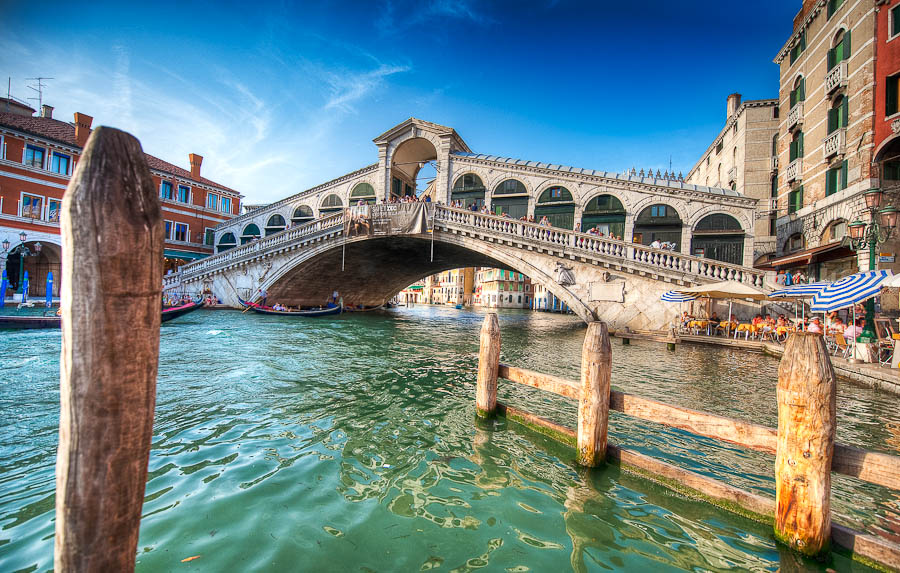
In the picture below, I climbed out on some posts over The Grand Canal, wrapped my left arm around a pole and took 5 exposures. If I hadn’t have taken the shot from that vantage point, I would have missed a great HDR opportunity.
Section B:
Camera Bracketing and Shooting without a Tripod.
How can I make my shots better for HDR Processing?
When shooting HDR photography, make sure that you shoot at the lowest ISO possible. When you process an HDR, the resulting image always has extra noise. It’s a byproduct of blending the bracketed exposures and applying tone mapping. Usually you can make adjustments to de-grain (or de-noise) the resulting image after the tone mapping but you want to assure you have the cleanest images possible going into the HDR processing. You can combat this issue by turning the ISO settings down on your camera; the lower the better.
So why not just shoot at the lowest ISO every time?
Hand Held shots can be much more difficult to achieve with a low ISO especially when shooting in low light environments. The lower the ISO, the lower the shutter speed. The lower the shutter speed, the more chance for the camera to shift while exposing the images. If the camera shakes while shooting you end up with blurry images. Blurry images are useless. With HDR processing, even a tiny bit of blur can be detrimental to the final image.
With this in mind, try your best to select the lowest ISO possible when shooting for HDR. If the resulting shutter speed is to low to handle, turn it up a notch. You can still process noisy images but can NOT process blurry ones. In good shooting situations like sunny days or well lit scenes, a low ISO will still give you a Moderate – High Shutter Speed.
Are there other ways to increase the shutter speed while keeping a low ISO?
This is easier to do with lens that has a high maximum aperture. Some lenses have maximum apertures of f/1.4 or f/1.8. These lenses give you more flexibility in low light situations. With camera aperture, the lower the number, the more light comes in the camera. Try and set the aperture as low as possible in order to boost the shutter speed.
It’s important to strike a balance between Shutter Speed, ISO, and Aperture. The lower you set the ISO, the higher the shutter speed will be. Setting the ISO higher will give you a faster Shutter Speed but will also increase the grain, hurting the integrity of the resulting HDR image. Turning up the Aperture will increase the shutter speed but will also increase the depth of field (softness). This effect is definitely the lesser of the three evils and can be compensated for by verifying that your subject is in full focus. I suggest tweaking the aperture down first, then finding a good balance between Low ISO and High Shutter Speed. Every shooting situation is different and will require a bit of finesse.
Yet another requirement is staying as still as possible when shooting. Most DSLR cameras have a rapid mode allowing you to fire off multiple shots in quick succession. Make sure this feature is enabled on your camera. Next, frame the shot, stabilize yourself the best you can, take a deep breath, and click the shutter. There also might be something you can lean against for support. Remember you are shooting a range of exposures and as you shoot, the shutter speed will change. Closely examine the results to make sure nothing came out blurry. If you feel that you moved too much or something doesn’t look right, re-shoot it. You may also want to consider tweaking the ISO or the Aperture in order to improve the Shutter Speed.
You can read more about the technical mumbo jumbo by visiting my Intro to HDR Photography Tutorial.
Section C:
Viewing & Exporting the Brackets in Adobe Lightroom
Before I start with this Section, I would like to address the software issue. Adobe Lightroom is not the only application that can do this portion of the tutorial. Even though I use Adobe Lightroom and fully recommend it, many other applications are able to view and export Raw photos.
Let’s take a look at our Lightroom Catalogue.
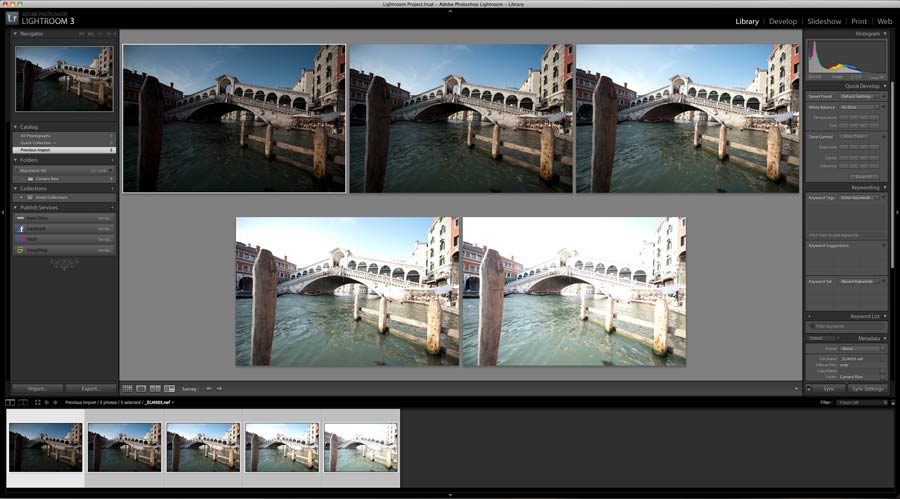
Here we have 5 bracketed exposures where a hand held camera was used. It’s not evident here but if I toggle through these images, there is quite a bit of shifting from shot to shot. When shooting hand held multiple exposures, it’s almost impossible to eliminate this. Instead we are going to rely on Adobe Photoshop to ‘re-align’ and stack these exposures.
First things first, we need to export these 5 images out.
Note: You can skip this step and go directly to Photoshop. However, I recommend using an application like Lightroom to sort and select the brackets before opening them in Photoshop. If you have shot multiple exposure sequences of the same shot, Lightroom is a quick way to select the best ones and eliminate the rest. Lightroom also has extremely good at processing Raw image data.
First, Select the bracketed exposures, Right Click and Select: “Export.” This bring up a new window.
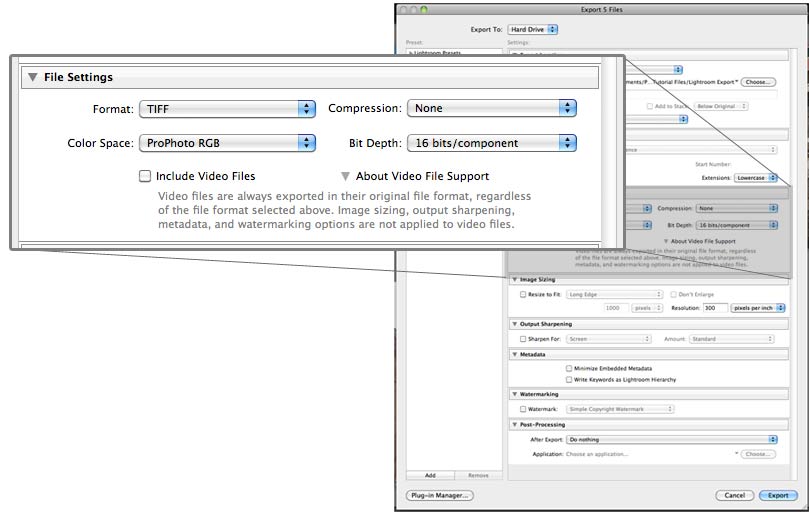
Create a folder to output the images. In this case I made a folder called “Lightroom Export.”
Here I’ve chosen to leave the File Naming as is.
Set the format to “Tiff”, the Color Space to either “Prophoto RGB” or “Adobe RGB,” (whichever is your preferred color space). In this case I’ve selected Prophoto RGB.
Set the Bit Depth to “16 bits” and the Resolution to 300 Pixels per inch (ppi). This will assure that all of the color and depth is preserved in the exporting of the Raw images.
Click Export.
Section D:
Stack & Align Bracketed Exposures in Photoshop
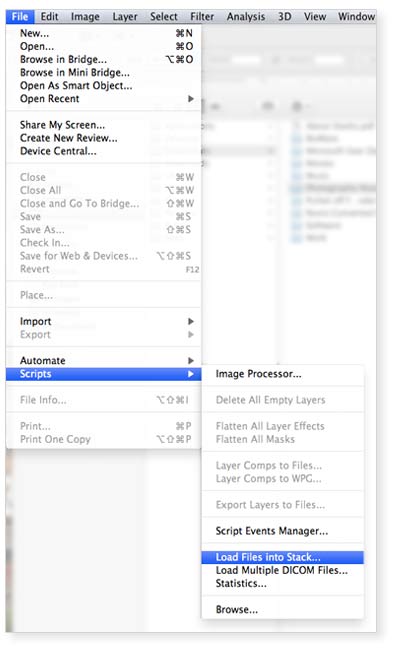
The next Step in this process is using Photoshop to stack and align our bracketed exposures. If we were able to shoot with a tripod, this step would be obsolete, unless there was still some camera shift for a different reason. While some HDR programs offer options to correct camera shift, Photoshop beats them all 100% of the time. Photoshop also allows you to view the result before you do any HDR Processing on the image stack. This way you can identify any problems and correct them.
First, we load the images:
Select: File / Scripts / Load files as stack
Browse for your images and toggle: “Attempt to Automatically Align Source Images”and then click OK.
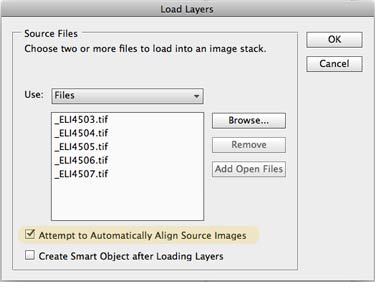
Now we have all 5 exposures as Photoshop layers. Each exposure is perfectly aligned and stacked from lightest to darkest. Nice and convenient huh?
Note: It’s important to understand that in some cases Photoshop will not align your images correctly. Though this is rare, I’ve experienced this problem with very dark exposures. You may also experience this problem if there are a lot of moving elements in your shot and not a lot of static objects for Photoshop to align. For these situations, some additional shifting may be necessary. Use the arrow keys to nudge layers into alignment before moving on to the next step.
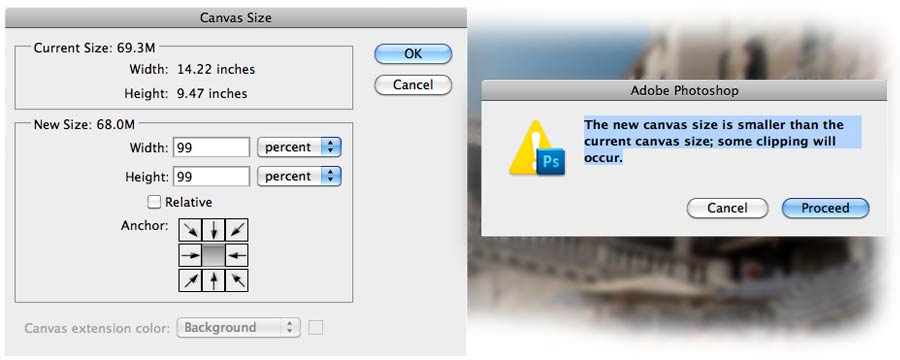
Since each image was shifted slightly to compensate for Camera Shift, we are left with little spaces around the edges. Since each exposure was shifted slightly different, this is a random shift from layer to layer. The easiest way to get rid of this is to edit the “Canvas Size.” Let’s do that now.
Select: Image / Canvas Size
Toggle Measurement to “Percent” and Set the Width and Height to “99”. This will shave off 1% of the image and eliminate the un-even edges.
A Dialogue box will pop up stating: “The new canvas size is smaller than the current canvas size; some clipping will occur.?
Click “Proceed”
At this point it’s a good idea to save your progress as a PSD. After we create our HDR Image using Photomatix Pro, we can bring the result into this PSD for further editing. This gives us the ability to blend in elements from single exposures that may be blurred or displaced after the images are combined. Since we are building the HDR Image from these layers, everything will maintain perfect alignment! Winner Winner Chicken Dinner!
Now we are ready to export these layers out as individual files.
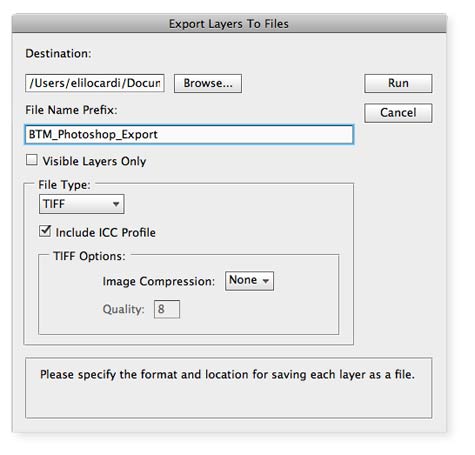
Select: File / Scripts / Export Layers to Files
Create a custom folder for your images. I’ve created a folder called “Tiff for HDR”
Select a name for your images.
Make sure that Tiff is selected and Image Compression is set to “None.” Also make sure that “Include ICC Profile” is checked. This will assure that our work flow remains lossless and our color profile continues to be embedded in these files.
After clicking “Run,” Photoshop will export all layers as individual Tiff files ready to be processed for HDR.

