Monkey Tips – Shooting Handheld HDR
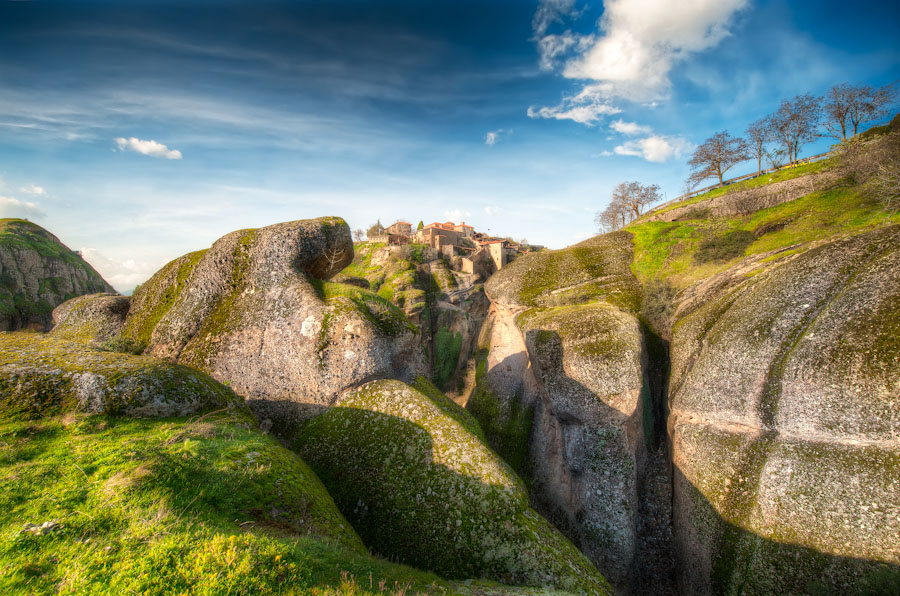
I like the freedom of shooting HDR Handheld. It gives me the ability to stick and move like a featherweight boxer, to float like a butterfly and sting like a bee. I can move around quickly and efficiently, finding dozens of unique compositions while the same process via tripod would only yield a few. Since I often shoot handheld, as in the case of today’s Image of Meteora, I even created a nifty Handheld HDR Tutorial that explains it in greater detail.
Keep in mind that there are some clear disadvantages to shooting Handheld HDR, like the fact that you have to align all the exposure brackets. This can cause serious issues with the quality of the final image if there is too much camera shake. Try and keep a few things in mind if you’re planning on shooting and processing handheld HDR.
With HDR Photography, nothing can really beat a good solid tripod. But hey, why on earth would we want to make it easy on ourselves? 😉
1. Shutter Speed.
Camera shake causes motion blur so always make sure that you’re using a suitable shutter speed. Keep in mind that most cameras, when set to Auto Exposure Bracketing in Aperture Priority Mode, will show the shutter speed for the bottom (negative) exposure first. If your camera shows the Median Exposure first, adjust your camera settings to show them in order from negative to positive. This will make the shutter speed calculation much easier.
So, let’s say that you have your camera set to Auto bracket 3 Exposures at (-2,0,+2). That means that your camera should be showing the shutter speed for the -2 bracket first. Let’s say it reads 1000. 1000 is a very acceptable shutter speed for handheld photography but we need to think about this a little more.
Disclaimer: There is a little bit of math involved. Sorry. ;p
Every time your camera moves to the next bracket of 1 (also referred to as: A Stop), the shutter speed will half itself. When you set your camera to auto bracket (-2, 0, +2), it means that each step is actually 2 stops _(like a bad country western line dance)._
Anyway, it’s really simple and here’s how it works. If (-2) = 1000, (-1) = 500, (0) = 250, (+1) = 125, (+2) = 60. So, the shutter speeds for (-2, 0, +2) will be 1000, 250, and 60. — You can see how quickly a shutter speed of 1000 becomes a measly 60.
If lighting allows, try to adjust the aperture of your camera until the first bracket reads somewhere between 2,000 – 3,000. A (-2) of 3,000 will give you a (+2) of about 180, which is much better for handheld photography. Shooting this way can minimize the chance of blurry exposure brackets.
2. Steady Hand
No matter how fast your shutter speeds are, you’re going to have to hold the damn camera as steady as possible (duh). It’s not just because of motion blur. It’s also because too much variation in movement from bracket to bracket may complicate the alignment process. Photoshop does a hell of a job aligning images but even (the all powerful) photoshop can only fix so much.
A very common problem can be too many shifts in perspective and/or parallax. Parallax occurs when objects at different distances move at different speeds. So if your camera is shaking and flopping around all over the place, the foreground elements will move and rotate quickly, while the background elements will only move slightly. Any rotation in the camera will amplify this effect and cause too many perspective shifts between frames. So camera shift = bad. Camera shift + rotation = really bad.
Something that helps me tremendously is turning on _(and using)_ my camera’s built in grid. Some camera grids are fancier than others but even the simple ones can help you anchor elements into frame. You can also use the little focus squares in the viewfinder to lock onto small details. I personally like to establish a horizon line with the grid, then use one of the focus squares to lock onto a specific point of reference.
Once you’ve locked on and you’re confident you can keep the camera steady, make sure that you have good square footing and take a deep breath. Some people like to shoot as the exhale, some like to shoot while holding their breath. Find out what works best for you.
Occasionally you can use things to brace yourself against or to lean the camera on. Try and be clever to find some of these helpers.
3. How many exposure brackets
Often, the 3 shot bracketing of (-2,0,+2) is enough for all situations. You would only (possibly) need additional brackets (of 7 or 9) if you were shooting into direct light, such as a sunrise or sunset. The bottom line is, if you don’t need them and you don’t have a tripod, don’t shoot them. The fewer layers there are to re-align, the better chance that they will align properly. It’s hard enough holding the camera still for 3 or 5 shots. Try and avoid 7 or 9.
4. Be realistic
If it’s full on darkness out there you’re probably not going to be able to pull off a 5 second handheld exposure. Sorry, that’s not being pessimistic, it’s being realistic. Unless you can magically turn yourself to stone at will, it may be time to dust off the old tripod. If tripods are not allowed, make sure you’ve turned the f-stop all the way down to the lowest setting.
Having fast glass can really help in these situations. Try using lenses with an aperture rating of 1.4 – 2.8. This will help to boost shutter speeds. You can even turn up the ISO a little bit if necessary but try to only do so as a last resort. Increases in ISO will cause more noise and grain.
5. Be mindful of the elements
The best example of uncooperative elements is the wind. Wind is a (absolute) Handheld HDR killer. If the wind is cranking, try kneeling down, resting your weight on the back of your legs by sitting back on your heels. Try to brace your elbows on your chest and hold the camera with both hands. This centers your mass and gives you more stabilization against the wind.
Also, try to square your footing as often as possible. On alpine hikes, this might be tricky as the terrain can be unforgiving. Do your best to get in a stable position before shooting. Some alpine conditions also make it nearly impossible to effectively set up a tripod, so these Handheld techniques are sure to come in handy.
6. Always shoot a backup
I always shoot the same scene twice if it’s hand held. This practice has saved my ass many times. Since alignment issues happen quite often, It’s good to have a backup version ready to go if things aren’t working out in post. Sometimes I even test both versions and see which one aligns better before I go ahead with HDR Processing.
If at this point you’re thinking, “yea, yea, get on with it already,” then move on to the Handheld HDR Tutorial.
Daily Banana – Meteora – Landscape Dreams
Technical Mumbo Jumbo:
– Nikon D3 – Nikkor 14-24 f/2.8@ 14mm f/5.6 Iso: 100
– 5 (Handheld) Exposure Brackets (-2,-1,0,1,2)
– HDR Photography Processing & Tone Mapping using Photomatix Pro
– Post Processing & Color Correction in Photoshop
– Enhanced detail with Nik Software Sharpener Pro
– Handheld FTW!
")


